
TL;DR
Moving your rig into a closet or small space can drastically cut noise and reflections. The most effective steps are soundproofing gaps, controlling low-frequency buildup with bass traps, and ensuring proper ventilation. Strategic placement and smart treatment make this setup quiet and functional.
Ever wondered why some closet setups sound surprisingly good, while others turn into echo chambers? The secret isn’t just in foam panels or thick blankets. It’s about smart placement, controlling low-end resonance, and making sure your gear doesn’t turn your closet into a mini amplifier. Whether you’re recording vocals or running a high-power AI rig, understanding what really works can save you time, money, and headaches.
In this guide, you’ll learn how to tame reflections, block noise transfer, and keep your gear cool — all in a small space. Plus, you’ll discover how moving your rig into a closet might be the best noise solution you’ve overlooked.
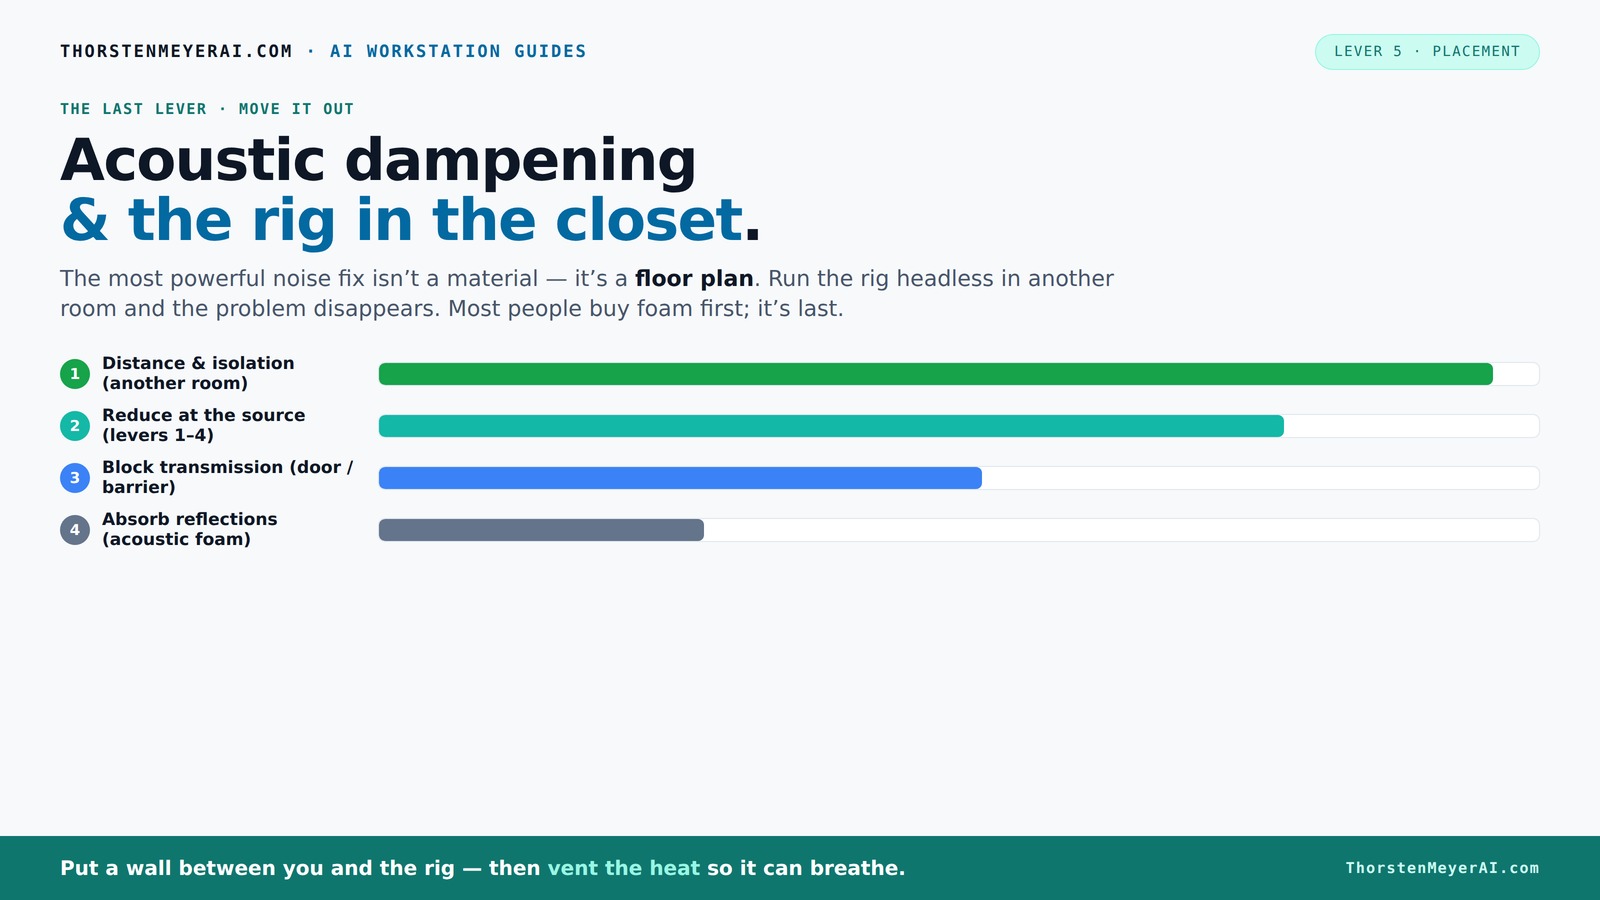
Acoustic dampening
& the rig in the closet.
The most powerful noise fix isn’t a material — it’s a floor plan. A rig you can’t hear because it’s in another room beats any amount of foam. Tap the approaches in Part 1 to see what actually works.
(another room)
(levers 1–4)
(door / barrier)
(acoustic foam)
Contain the noise, not the heat
Key Takeaways
- Prioritize sealing gaps around doors, outlets, and windows before adding absorption materials.
- Target first reflection points on side walls and behind the mic with acoustic panels for clearer sound.
- Place bass traps in corners to control low-frequency resonance and prevent boominess.
- Use portable reflection filters and soft furnishings to improve vocal recordings without structural changes.
- Ensure proper ventilation when placing a high-power rig in a closet to avoid overheating and performance issues.

8 Pack - Bass Traps Acoustic Foam Corner, 9.8x9.8 * 4.7'' Black Bass Traps Corner Studio Foam, High Density and Fire-Proof Bass Traps Acoustic Panels Recording Studio Acoustical Treatments
- Acoustic Enhancement: Improves low-frequency response and clarity
- Versatile Applications: Suitable for studios, theaters, offices, and more
- High-Quality Material: Made from fire-retardant, eco-friendly high-density foam
As an affiliate, we earn on qualifying purchases.
As an affiliate, we earn on qualifying purchases.
Soundproofing vs. Acoustic Dampening: What's the Real Difference?
Soundproofing blocks noise from escaping or entering your space, while acoustic dampening reduces echoes and reflections inside. Think of soundproofing like sealing a box — it keeps everything quiet outside. Acoustic treatment, on the other hand, makes the sound inside your space clearer and less boomy.
Understanding these differences is crucial because they serve different purposes: soundproofing is about isolation, preventing external noise from interfering with your recordings or disturbing neighbors. Acoustic dampening improves the internal sound quality, making recordings cleaner and more professional. The tradeoff often involves cost and complexity; soundproofing might require heavy barriers or structural modifications, while dampening can be achieved with panels and diffusers that are easier to install. For more on how to optimize your space, check out acoustic dampening tips.
The Critical Role of First Reflection Points and How to Find Them
First reflection points are the spots on your walls where sound hits first and bounces directly into your ears or mic. If you treat these spots, you cut down on early echoes that muddy your recordings or make your room sound boxy. You can learn more about finding these points in this guide on acoustic treatment.
To find them, use a simple mirror. Sit in your usual position, and have a friend slide the mirror along the wall. When you see the mic or speaker in the mirror, that’s your reflection point. Place an acoustic panel there.
This trick is a game-changer. By targeting these specific spots, you effectively reduce the most prominent early reflections that cause muddiness and comb filtering, leading to clearer recordings and more natural sound. Properly treating these points can also help you avoid the need for extensive reverb or EQ adjustments later, saving time and improving your workflow. It’s a cost-effective way to make a big difference in your room’s acoustics with minimal effort.
Where to Place Bass Traps in a Small Closet for Low-End Control
Bass traps are your best friends in tight spaces. They sit in corners, where low frequencies tend to pile up and cause boomy, muddy sound. In a small closet, focusing on the corners—especially where walls meet the ceiling—is crucial. For detailed advice on placement, see this article on bass trap placement.
For example, if your closet has a tall ceiling, placing bass traps in the corners where the ceiling and walls meet can dramatically tame low-end resonance. This prevents the booming sound that makes vocals or instruments sound hollow or muffled.
Choosing the right bass traps involves considering size, material, and placement. High-density foam or mineral wool traps that fit snugly into corners are ideal because they maximize surface area and absorption. Effective placement involves installing traps in all primary corners—floor-to-ceiling, wall-to-wall, and where the ceiling meets the walls—to address the most common low-frequency buildup points. This strategic placement ensures your mix isn’t compromised by muddiness, and your recordings sound tight and controlled.
Effective Use of Reflection Filters and Soft Materials for Vocals
Reflection filters are a quick, portable fix to tame vocal reflections. They hang behind your mic, creating a buffer zone that absorbs sound waves bouncing back from nearby surfaces. When combined with soft furnishings like blankets or a thick carpet, they make a noticeable difference. Learn more about effective vocal treatment options at this resource on acoustic treatment.
Imagine recording vocals in a tiny closet with a bare wall behind you. The reflections bounce back into the mic, making your voice sound nasal or distant. Adding a reflection filter and a rug on the floor dramatically reduces this, resulting in a richer, more professional sound.
While reflection filters are effective at reducing immediate room reflections, they are not a complete solution for room acoustics. Combining them with soft materials like blankets, foam panels, or even hanging quilts can further absorb stray reflections, preventing phase issues and coloration. This layered approach enhances clarity and warmth in vocal recordings, making even modest setups sound more polished. The tradeoff is that overusing soft materials can deaden the space too much, so balancing absorption with some reflective surfaces is key for a natural sound.
Sealing Gaps, Outlets, and Doors: The Key to Real Soundproofing
Gaps around doors, outlets, and windows are silent pathways for noise to escape or sneak in. Sealing these is a game-changer for a closet rig meant for quiet work or recording. For detailed sealing techniques, see this guide on sealing gaps.
Use weatherstripping or draft stoppers around doors. Cover outlets with gasket foam or outlet sealers. Even small cracks can leak sound, ruining your efforts.
Sealing gaps not only prevents sound leakage but also enhances the overall effectiveness of your acoustic treatments. When sound escapes through tiny cracks, it can undermine the entire setup, making your efforts seem futile. Proper sealing creates a more controlled environment, allowing your dampening materials to work more efficiently. For example, sealing a gap around your closet door can drop noise transmission by up to 20 dB, which can be the difference between a usable space and one with annoying background noise. It’s a small investment that yields significant returns in sound isolation.
Ventilation and Cooling: Making the Closet Rig Work Without Overheating
Putting a powerful machine in a sealed closet traps heat. Without airflow, your rig will overheat, throttling performance and making fans roar. The key is to add ventilation that keeps air moving — quietly.
Passive vents or ducted exhaust fans are your best bets. For example, a small, quiet fan can pull hot air out while drawing in cooler air through a vent. This keeps the temperature stable and your rig happy.
Choosing the right cooling method involves balancing noise levels and airflow. High-performance cooling solutions like quiet ducted fans or vented panels can significantly reduce heat buildup without introducing noise pollution. Proper ventilation not only prevents overheating but also reduces humidity, which can be detrimental to electronic components over time. Implementing these solutions requires understanding your specific space constraints and noise tolerance, but investing in good cooling can extend the life of your equipment and improve performance.
Putting It All Together: Designing Your Perfect Closet Rig
Start with the basics: seal gaps, find and treat the first reflection points, and install bass traps in corners. Add a reflection filter and soft furnishings for vocals. Ensure your ventilation keeps the rig cool. Done right, your closet transforms into a quiet, effective workspace.
For example, a user sealed their closet with weatherstripping, added foam panels at reflection points, placed bass traps in corners, and installed a quiet exhaust fan. The result? A near-professional sound with zero noise leakage and perfect low-end control.
Remember, the goal isn’t to deaden every surface but to balance absorption, reflection, and ventilation for your specific needs. This holistic approach ensures your space sounds natural and performs reliably, avoiding the common pitfalls of over-treating or neglecting essential airflow.
Frequently Asked Questions
Do I need acoustic treatment or soundproofing for a closet rig?
It depends on your goals. If you want to block external noise and prevent sound leakage, focus on soundproofing gaps and adding mass. For improving sound quality inside, acoustic treatment like panels and bass traps is key. Often, a combination works best.Where should I place acoustic panels in a closet studio?
Start with the first reflection points on side walls, then treat the wall behind your microphone, and finally, the ceiling if needed. Corners are ideal for bass traps. Use the mirror trick to identify reflection points easily.Can I just use blankets or foam panels for a closet setup?
Blankets and foam panels help reduce reflections and echoes but won’t block sound transfer through walls or gaps. For best results, combine soft materials with sealing gaps and strategic placement of bass traps.How do I prevent my closet from becoming too dead-sounding?
Balance absorption with reflective surfaces. Use diffusers or softer furnishings to add some liveliness back into the space, preventing the sound from becoming overly dull or muffled.Is a reflection filter enough for vocal recording?
A reflection filter significantly reduces nearby reflections, but for optimal sound, combine it with proper room treatment and positioning. It’s a great quick fix but not a complete solution on its own.Conclusion
Transforming a closet into a quiet, functional rig isn’t about spending a fortune on foam. It’s about strategic placement, sealing the gaps, and managing heat. With a little planning, your small space can deliver big results — clear, professional sound and silent operation.
Think of your closet as a blank canvas. With the right treatment and setup, it becomes a powerhouse of productivity and creativity. Your next step? Start sealing, treating, and venting. Your perfect quiet workspace is waiting.