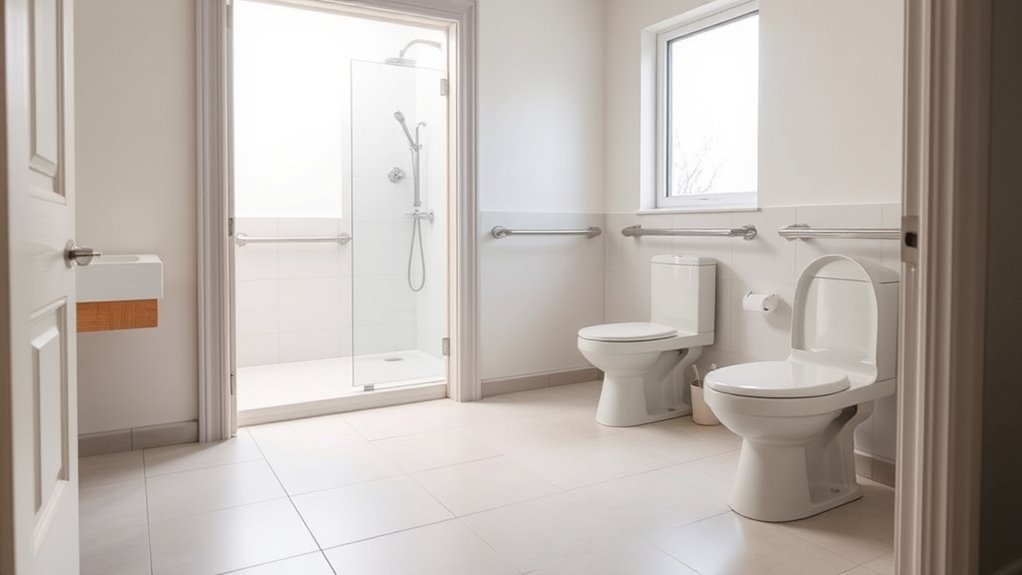

To create an accessible bathroom layout, guarantee open, unobstructed spaces with at least 60 inches of clearance around fixtures like the toilet, sink, and shower. Widen doorways to a minimum of 32 inches and install fixtures at reachable heights, such as 17–19 inches. Incorporate grab bars, non-slip surfaces, and ramps with gentle slopes for safety. Proper placement and secure installation are key—continue exploring to learn how strategic design can make your bathroom truly accessible.
Key Takeaways
- Ensure at least 60 inches of clear space around fixtures for easy wheelchair maneuverability.
- Position sinks and toilets at accessible heights, typically 17–19 inches from the floor.
- Widen doorways to a minimum of 32 inches for wheelchair access.
- Install grab bars near the toilet and shower at 33–36 inches from the floor for safety.
- Incorporate ramps with a 1:12 slope, non-slip surfaces, and proper side supports where needed.

Ensuring bathroom accessibility is essential for creating a safe and comfortable environment for everyone, especially those with mobility challenges or disabilities. When designing or renovating a bathroom, paying attention to layout basics can make a significant difference in independence and safety. One of the first steps is to consider the placement of grab bars, which provide crucial support for individuals transferring from a wheelchair or maintaining balance while standing. Installing grab bars near the toilet and inside the shower or bathtub ensures stability and helps prevent falls. Choose sturdy, corrosion-resistant materials and position them at a height that’s easy to grasp, typically between 33 and 36 inches from the floor. Proper placement and secure installation are vital for these safety features to be effective. Incorporating vetted product reviews can help identify the best grab bars and accessories for your needs.
In addition to grab bars, wheelchair ramps are a fundamental aspect of bathroom accessibility. If your bathroom has a step or threshold, replacing it with a ramp eliminates barriers that could hinder mobility. A wheelchair ramp should have a gentle slope—ideally 1:12—that makes it manageable for wheelchairs without requiring excessive effort. The ramp’s width should be at least 36 inches to accommodate different wheelchair sizes comfortably, and it should have non-slip surfaces for added safety. Including side rails or edges can prevent wheelchairs from slipping off the ramp. When planning for ramps, ensure they connect smoothly to the bathroom entrance and are designed in accordance with local building codes for safety and compliance.
The overall layout should prioritize open, unobstructed space. Aim for a minimum of 60 inches of clearance around the toilet and in front of the sink and shower to allow easy maneuvering. Fixtures like sinks and toilets should be installed at accessible heights—typically 17 to 19 inches from the floor—so that they are reachable from a wheelchair. Keep in mind that doorways need to be widened to at least 32 inches to accommodate wheelchairs comfortably. Also, consider lever-style handles instead of knobs, as they’re easier to operate for people with limited hand strength or dexterity.
Frequently Asked Questions
What Are the Latest ADA Bathroom Design Standards?
You should follow the latest ADA standards by installing grab bars near toilets and showers, ensuring they’re securely anchored. Use slip-resistant flooring throughout the bathroom to prevent accidents. Doors should be wide enough for wheelchair access, and fixtures placed at accessible heights. Keep clear space for maneuvering, and make sure controls are easy to reach and operate. Staying updated with these standards helps create a safer, more accessible bathroom environment.
How Can I Modify My Existing Bathroom for Better Accessibility?
Think of your bathroom as a well-orchestrated dance floor. To improve accessibility, install sturdy grab bars near the toilet and shower for support. Replace existing flooring with non-slip surfaces to prevent falls, especially when wet. Widen doorways if possible, and clear pathways of clutter. These modifications create a safer, more welcoming space, making daily routines smoother and giving you peace of mind.
What Budget Options Are Available for Accessible Bathroom Renovations?
You can explore cost-effective fixtures like lever handles, grab bars, and walk-in showers to improve accessibility on a budget. Consider budget-friendly modifications such as repainting, reconfiguring fixtures, or adding non-slip mats. Shopping sales or secondhand stores can also help you find affordable options. Focus on essential upgrades that enhance safety and usability without overspending, making your bathroom more accessible without breaking the bank.
Are There Specific Materials Recommended for Safety and Durability?
Think of your bathroom as a fortress where safety is your shield. For this, choose non-slip flooring that grips like an anchor, preventing slips. Opt for water-resistant surfaces on walls and countertops to ward off moisture damage like an uninvited storm. These materials act as your armor, ensuring durability and safety, while keeping your space looking fresh and resilient through the years.
How Do I Plan for Future Mobility Needs in Bathroom Layout?
To plan for future mobility needs, you should incorporate adaptable design features that future-proof bathrooms. Think about installing grab bars, wider doorways, and roll-in showers now, so they can accommodate changing needs later. Use flexible fixtures and adjustable heights to make modifications easier. By integrating these adaptable features, you guarantee your bathroom remains functional and safe as mobility requirements evolve, saving you time and money long-term.
Conclusion
Ensuring your bathroom is accessible makes a significant difference—nearly 13% of U.S. households have at least one person with a disability, highlighting the importance of thoughtful design. By incorporating simple layout basics, you create a space that’s safe and functional for everyone. Remember, a well-designed bathroom not only enhances independence but also offers peace of mind for visitors and family alike. Prioritize accessibility today to make your home welcoming for all.